- 2022年6月10日
この記事にて、FOTA(Firmware Over The Air)でそれぞれのIOTデバイスのファームウェアをアップデートする方法を紹介する。例として今回はIOTによく使われるM5Stackを試してみるわ。Let Go!
そもそもFOTAはなんだったっけ?
FOTA(Firmware Over The Air)は開発ソフトと書き込み回路を使わずに無線でデバイスにファームウェアをアップデートできる技術となる。面白くてスマホみたいですね。販売後、デバイスのパラメータ、機能などの変更があれば、お客さんのところに行ってファームウェアを書き込まないといけないと思う人が多いがFOTAを使って現地に移動せずに簡単にファームウェアをアップデートできて楽になる。
FOTAを使用するメリットはなに?
- 多くの場合、IOTデバイスを小さくパッケージするので外の対応する接続Portは無くしていて無線で接続できるようにしている。
- メンテナンス、ファームウェアのアップデートに便利だし、新機能を追加したり、修正したりことに便利だ。
ただし、どんなものでもメリットもあるしデメリットもあるし。FOTAを使うために、メモリが少なくなったりなる。また、FOTAでファームウェアのアップデートの場合はセキュリティ面をしっかり検討しないといけない。
では、実装しましょう!
開発ツールはArduino IDEかPlatform IOかどちらでも使える。
まずはライブラリを追加する。
WiFi.h、WiFiClient.h、WebServer.h、ESPmDNS.h、Update.h、M5Stack.h。
ログインとアップデートサイトを実装する。
/* Style */
String style =
"<style>#file-input,input{width:100%;height:44px;border-radius:4px;margin:10px auto;font-size:15px}"
"input{background:#f1f1f1;border:0;padding:0 15px}body{background:#3498db;font-family:sans-serif;font-size:14px;color:#777}"
"#file-input{padding:0;border:1px solid #ddd;line-height:44px;text-align:left;display:block;cursor:pointer}"
"#bar,#prgbar{background-color:#f1f1f1;border-radius:10px}#bar{background-color:#3498db;width:0%;height:10px}"
"form{background:#fff;max-width:258px;margin:75px auto;padding:30px;border-radius:5px;text-align:center}"
".btn{background:#3498db;color:#fff;cursor:pointer}</style>";

/* Login page */
String loginIndex =
"<form name=loginForm>"
"<h1>UNIFACE HUB</h1>"
"<h1>M5STACK FOTA</h1>"
"<input name=userid placeholder='User ID'> "
"<input name=pwd placeholder=Password type=Password> "
"<input type=submit onclick=check(this.form) class=btn value=Login></form>"
"<script>"
"function check(form) {"
"if(form.userid.value=='uniface' && form.pwd.value=='uniface')"
"{window.open('/serverIndex')}"
"else"
"{alert('Error Password or Username')}"
"}"
"</script>" + style;

/* Server Index Page */
String serverIndex =
"<script src='https://ajax.googleapis.com/ajax/libs/jquery/3.2.1/jquery.min.js'></script>"
"<form method='POST' action='#' enctype='multipart/form-data' id='upload_form'>"
"<input type='file' name='update' id='file' onchange='sub(this)' style=display:none>"
"<label id='file-input' for='file'>   Choose file...</label>"
"<input type='submit' class=btn value='Update'>"
"<br><br>"
"<div id='prg'></div>"
"<br><div id='prgbar'><div id='bar'></div></div><br></form>"
"<script>"
"function sub(obj){"
"var fileName = obj.value.split('\\\\');"
"document.getElementById('file-input').innerHTML = '   '+ fileName[fileName.length-1];"
"};"
"$('form').submit(function(e){"
"e.preventDefault();"
"var form = $('#upload_form')[0];"
"var data = new FormData(form);"
"$.ajax({"
"url: '/update',"
"type: 'POST',"
"data: data,"
"contentType: false,"
"processData:false,"
"xhr: function() {"
"var xhr = new window.XMLHttpRequest();"
"xhr.upload.addEventListener('progress', function(evt) {"
"if (evt.lengthComputable) {"
"var per = evt.loaded / evt.total;"
"$('#prg').html('progress: ' + Math.round(per*100) + '%');"
"$('#bar').css('width',Math.round(per*100) + '%');"
"}"
"}, false);"
"return xhr;"
"},"
"success:function(d, s) {"
"console.log('success!') "
"},"
"error: function (a, b, c) {"
"}"
"});"
"});"
"</script>" + style;
この記事では、ID:uniface, Pass: unifaceを使って簡単にアップデート時に認証を確認ためです。個人的に変更しても構いません。
Setup関数では、M5Stackの初期化、WiFiの接続、OTA機能などを実装する。
void setup(void) {
  M5.begin();  //Init M5Core.
  M5.Power.begin(); //Init Power module.

  // Connect to WiFi network
  WiFi.begin(ssid, password);
  Serial.println("");

  // Wait for connection
  while (WiFi.status() != WL_CONNECTED) {
    delay(500);
    Serial.print(".");
  }
  Serial.println("");
  Serial.print("Connected to ");
  Serial.println(ssid);
  Serial.print("IP address: ");
  Serial.println(WiFi.localIP());

  /*use mdns for host name resolution*/
  if (!MDNS.begin(host)) { //http://esp32.local
    Serial.println("Error setting up MDNS responder!");
    while (1) {
      delay(1000);
    }
  }
  Serial.println("mDNS responder started");
  /*return index page which is stored in serverIndex */
  server.on("/", HTTP_GET, []() {
    server.sendHeader("Connection", "close");
    server.send(200, "text/html", loginIndex);
  });
  server.on("/serverIndex", HTTP_GET, []() {
    server.sendHeader("Connection", "close");
    server.send(200, "text/html", serverIndex);
  });
  /*handling uploading firmware file */
  server.on("/update", HTTP_POST, []() {
    server.sendHeader("Connection", "close");
    server.send(200, "text/plain", (Update.hasError()) ? "FAIL" : "OK");
    ESP.restart();
  }, []() {
    HTTPUpload& upload = server.upload();
    if (upload.status == UPLOAD_FILE_START) {
      Serial.printf("Update: %s\n", upload.filename.c_str());
      if (!Update.begin(UPDATE_SIZE_UNKNOWN)) { //start with max available size
        Update.printError(Serial);
      }
    } else if (upload.status == UPLOAD_FILE_WRITE) {
      /* flashing firmware to ESP*/
      if (Update.write(upload.buf, upload.currentSize) != upload.currentSize) {
        Update.printError(Serial);
      }
    } else if (upload.status == UPLOAD_FILE_END) {
      if (Update.end(true)) { //true to set the size to the current progress
        Serial.printf("Update Success: %u\nRebooting...\n", upload.totalSize);
      } else {
        Update.printError(Serial);
      }
    }
  });
  server.begin();
}
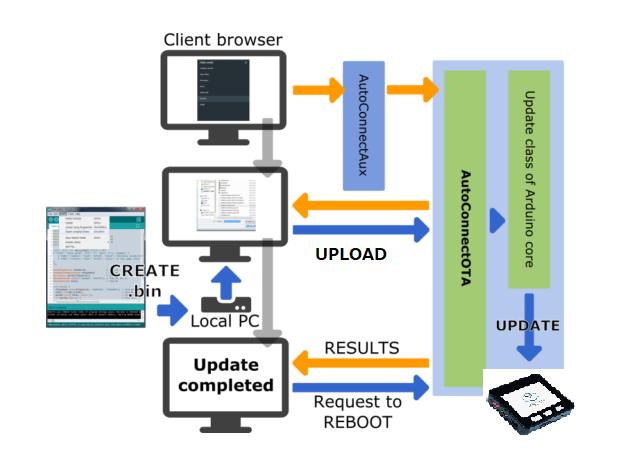
上記のコードでは、簡単にOTA機能が含まれてる。基本のエベントは
- {ip/}:M5stackのIPまたHostNameにアクセスした後、ログインページをユーザーに返却する。
- ログインページでIDとPassの認証が成功だったら、/serverIndexリンクでアップデートパージに移動する。
- クライアントからファームウェアの受信が完了したら「Update.h」ライブラリを使ってM5Stackにファームウェアをアップデートする。
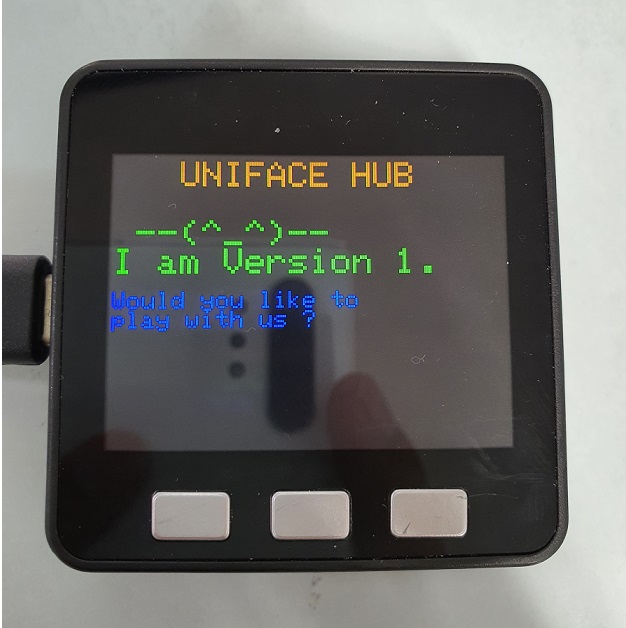
簡単なアプリを使って、M5StackのLCDに文字を表示する。
void app_loop()
{
    M5.Lcd.setCursor(0, 0);
    M5.Lcd.setTextSize(3);
    M5.Lcd.setTextColor(ORANGE, BLACK);
    M5.Lcd.println("   UNIFACE HUB");

    M5.Lcd.setCursor(0, 50);
    M5.Lcd.setTextColor(GREEN, BLACK);
    M5.Lcd.println(" --(^_^)--");
    M5.Lcd.println("I am Version 1.");
    M5.Lcd.setCursor(0, 110);
    M5.Lcd.setTextColor(BLUE, BLACK);
    M5.Lcd.setTextSize(2);
    M5.Lcd.println("Would you like to");
    M5.Lcd.println("play with us ?");
}
動作確認しましょう!
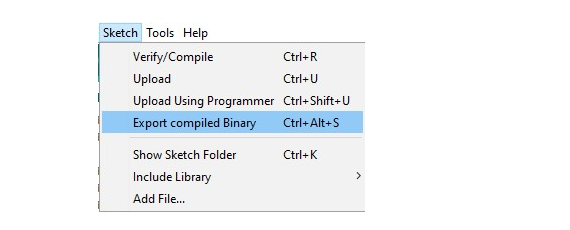
実装したコードをビルドしてM5Stackにファームウェアを書き込む。
最初のファームウェア(Ver1)となる。
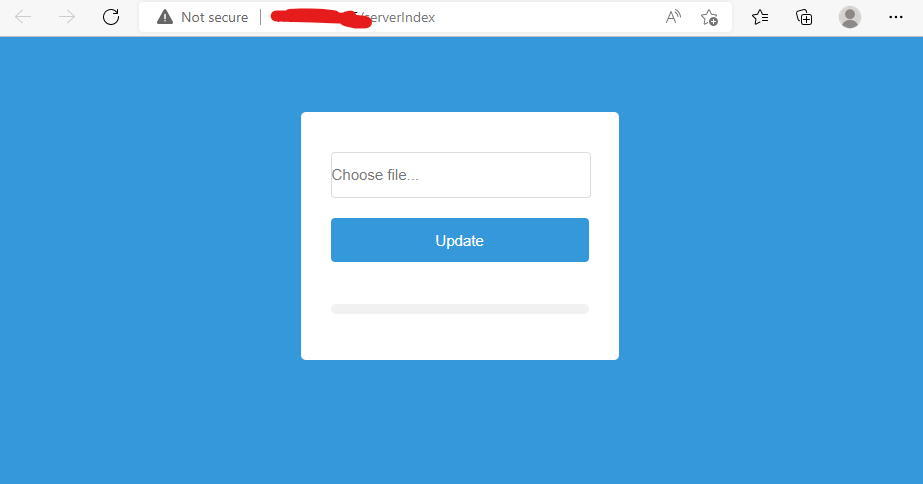
M5Stackを起動させた後、M5StackのIPを教えてもらってブラウザでそのIPをアクセスする。
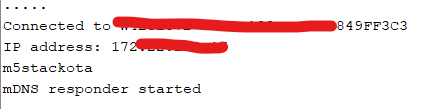
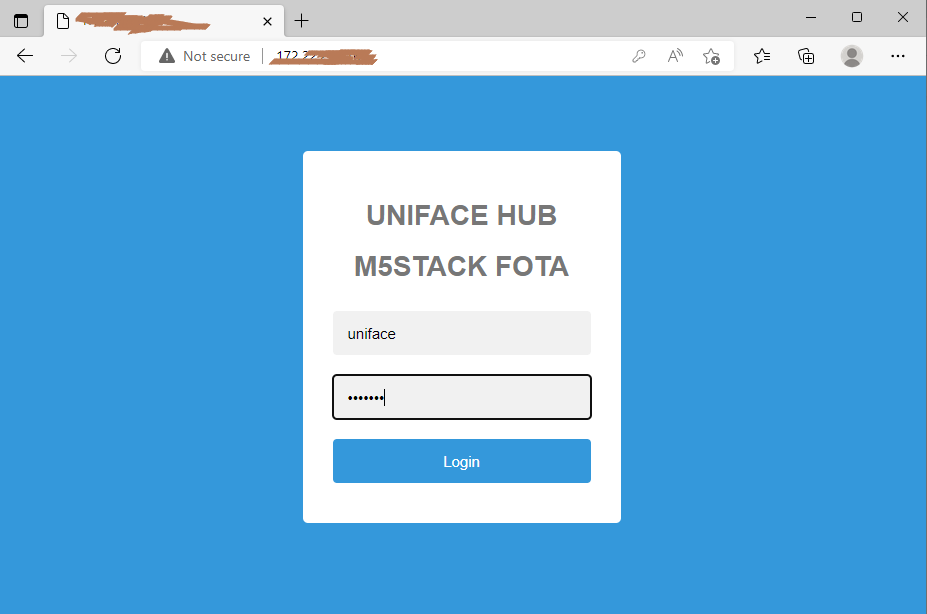
ほら、アクセスできた。
IDとPassを入力したら、アップデートページに移動する。
次に、FOTAでファームウェアのVer2をアップデートする。
ファームウェアのVer2を準備しましょう!。もちろん、FOTA機能も入れておく。
先のapp_loop()関数の中にメッセージを編集する。M5.Lcd.println(“I am Version 2.”);
ビルドして、開発Arduino IDEにて*.binを出力する

ここまではファームウェアVer2を準備できました。アップデートページに戻ってファームウェアVer2を選択してアップデートしましょう!。
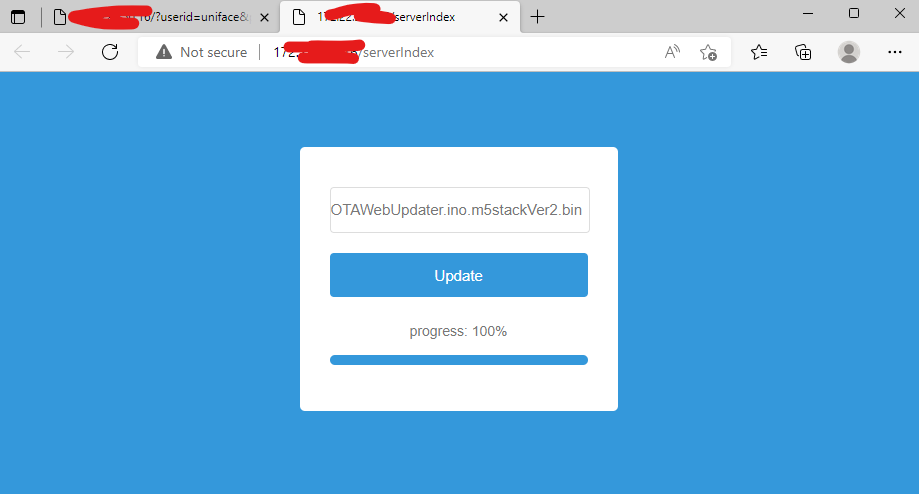
ロッドが100%までになったらアップデートが完了する。M5Stackがアップデートした後に自動に再起動する。じゃ。。。ちゃんとアップデートできたかどうかを確認しましょう!。
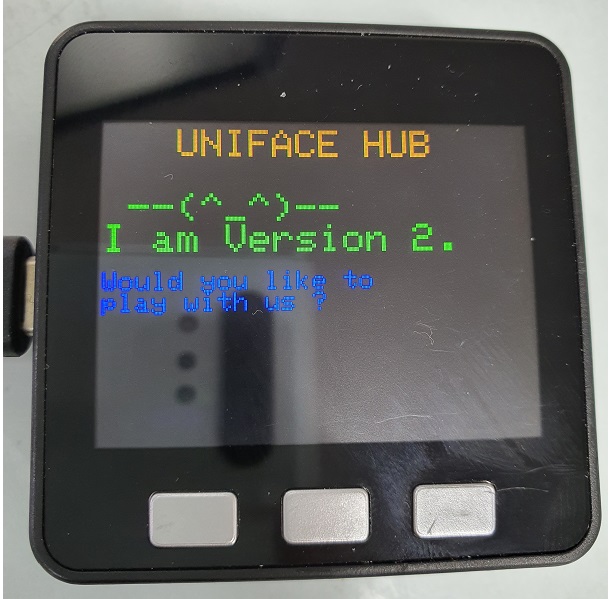
ほら、ファームウェアVer2をアップデートできました。
まとめ
Local WiFiを使ってFOTAでM5Stackのファームウェアを簡単にアップデートできました。楽ですが、商用製品ならセキュリティの方をしっかり考えないといけないですね。
また、せっかくFOTAでアップデートするので、Local WiFiならちょっと不便かなと思う人もいると思う。次回はファームウェアのアップデートサーバー環境を立ち上がってインターネットで自動に新しいバージョンを問い合わせてアップデートする機能を紹介する。